Priceless

At the time I installed the saddlebags, I could've written it like this -- in imitation of the famous "Mastercard" advertisements of a decade ago:

  • Turn Signal Replacement kit:  $300
  • Harley Davidson Hard Bags:  $700
  • Harley Davidson installation Fee:  $300
  • Having a place to carry milk home from the grocery store in style, while soccer mom's watch from their mini-vans in envy:  Priceless

I told the story of the saddlebag installation in an earlier blog entry.  I'm not a very good mechanic.  

I saved the installation fee by doing it myself, and we were off and running.  My wife put the saddlebags to practical use.  Not that the bike was an errand-running machine, but she did find it handy to bring home a box of doughnuts or a gallon of milk while out on a ride. 

Then this year, 3 years later, my wife's bike developed a quirk in the turn signals.  The left turn signal would blink rapidly - even though no burned out bulbs.  And a warning light appeared on the "dash".

I've been pretty busy at work, and haven't had time to turn a wrench.  We ended up sending my wife's bike to the Harley Dealership for an oil change in preparation for an up-coming trip.  And, in the process, could you please look at the turn signal situation.

So, again in the style of the famous "MasterCard" ad campaign:

  • Replacement wire:  $7.00
  • Replacement bolts:  $1.34
  • Labor to replace damaged wiring harness:  $70.00
  • Being able to pay someone else to fix your mistakes:  Priceless

Over the three years the wiring I had installed became frayed, and eventually began to short out on the rear fender.  The service desk at the Harley Dealership said matter of factly:  The turn signal relocation kit was installed incorrectly.

I said, "I have no doubt of that, says the dumbass who installed it."

He grinned, and with grace that allowed me to save face, said, "Well, we learn by doing, don't we."

He was right.  I don't regret it.  I'm proud for getting three years of service out of my wiring job, and not at all disappointed that it cost me $78.34 to fix my mistake.

Sometimes it's great to be able to write a check and have someone else clean up your mess. 


ST1300 Helmet Hook

I have owned the ST1300 since 2011 but have never found a suitable helmet lock for it.  Consequently I've just been stowing my helmet inside one of the saddlebags.  It works but it is inconvenient.  You can't stow other items in the bag along with the helmet. 


Being repeatedly stuffed inside the bag has prematurely aged my helmet too.


I'm due for another helmet, but I told myself I couldn't getbanother helmet until I solved the storage problem.

At Cycle Outfitters today, I was nosing around looking for helmet hooks.  I was thinking I'd have to buy something and customise it to work on the ST.  Surely nobody makes a helmet hook for the ST.

The salesman pointed me to the Kuryakyn license plate helmet hooks, which he said would work on my bike.

Great!  I bought it.

Turns out in reality it doesn't work "out of the box" on the ST1300.  The bracket, installed as described in the instructions, interferes with the bags.  I could reverse the bracket to gain some more space between the helmet lock and the hard bags, but noe I have a new problem:  the helmet hangs down and rests on the exhaust tip.  

That won't do!

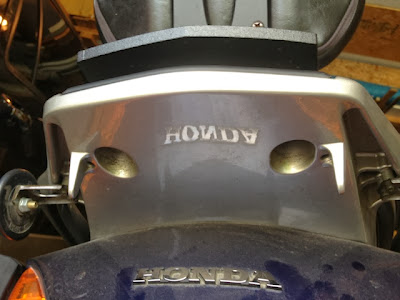
I looked at the luggage rack on the bike, and the two 8 mm bolts which peeked out of their holes in the rear cowling, just below the luggage rack.

Perhaps I could tie into those bolts, and fashion a working solution.

A quick trip to the hardware store yielded the necessary materials, for under seven dollars.

2 8mm coupler nuts
2 hex head bolts, 8mm
1 U bolt

That final item was a stroke of inspiration.  I needed a crosspiece to mount between the two luggage rack bolts, and to allow me to mount the Kuryakyn helmet lock onto a 1/8" thick sturdy metal beam.  I searched for a while in the store, looking at various mending braces and contemplati the amount of cutting and shaping I would have to do.

I spied the U bolts, and noticed the cross-piece for this was the right dimensions, with the two larger holes pre-drilled.  That would leave two smaller holes for me to drill for mounting the lock itself.  Something I knew I could handle.


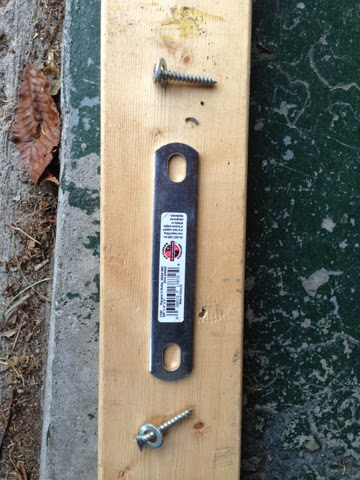
I discarded the U shaped bolt and retained the metal cross piece for my bracket.

This photo shows the luggage rack and the two bolt holes on the bottom of the rear cowling.


This photo shows the placement of the coupler nut on the end of the 8mm bolt.

Both coupler nuts are in place, providing a firm mounting platform for my custom made bracket.
Using a scrap of lumber I first fastened down the cross piece temporarily using wood screws.  This was in lieu of clamping the work down.


After this i marked the holes by lining up the helmet holder bracket to the crosspiece. Then I drilled out the  holes and using fasteners provided in the Kuryakyn kit, I bolted the helmet hook to the bracket.

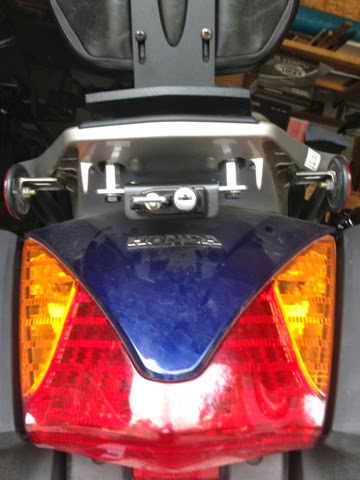
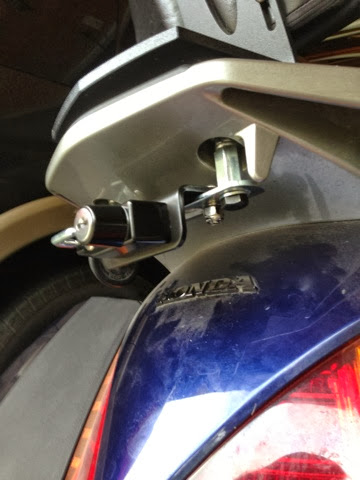
The hex head black bolts hold the bracket fast to the coupler nuts.

Here is the finished project.

This photo shows details of the helmet hook, the custom bracket, and the coupler nuts.


It won't win any beauty contests, and it's not terribly secure.  A 13mm wrench and the whole bracket is removed in a minute's time.  

But it's more secure than hanging it on my footpeg, and leaves my saddlebags free for other items.

It works for me.

Boggling Bagger

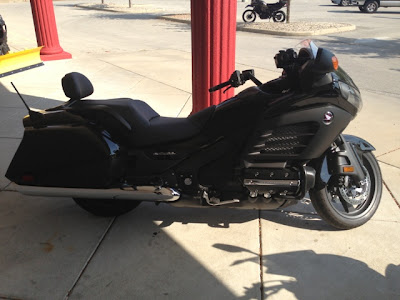
Honda entered the burgeoning Bagger market with a chopped and channelled Gold Wing re-branded the F6B.  It was a cool idea, and some of the press photos and reviews have made it seem appealing.  But in person you can see its awkward heft and beam.  All black is cool.   I suppose Black is slimming.   But it looks like it needs to go on a diet.

Cowpoke

A visit to the local Kawasaki dealer offered me an up close view of the new Vaquero.  The name means "cowboy" and ironically the bike looks (and I presume handles) like a cow.

Why I Mostly Ride Alone

I remember how excited I was the first time I went on a group ride with some friends from work.  It was a rite of passage, an important milestone in my progress as a rider -- I graduated from riding alone, commuting back and forth to work, to riding with a group.

How exciting to ride with a group.  To spend a day riding for the sake of riding.

It sounds wonderful, and adventuresome.

I remember the first twinge of regret on that trip.  I remember seeing an interesting site along the way, which I wanted to explore.  I remember asking Bob, over the sound of our idling engines, at a stop sign.  Which way should we go?

I remember being overruled.  Instead of the wayward trip, we took the twisty road more travelled.

I was willing to forgo my choice in destination, in favor of companionship.

I continued to ride with this group, once or twice a year.

It wasn't until a few years later that the clash in our riding styles really came to a head.

All along, as a rider, I have had a bad back, but despite this limitation have ridden across state lines, even from Indianapolis to Huntsville in a single day.  I am able to overcome my bad back by nurturing it.  Simply stopping to stretch every 60 to 90 minutes allows my back to stay healthy.

But surrendering my riding style to accommodate my friends riding style, I rode for three hours without a break.  Not familiar with the territory, having no notion of our route, I dared not disengage from the pack, though my screaming back begged for relief.

Finally I had no choice but to break off.  When we finally took a break, I separated from the group, and limped home with frequent stops to rest my aching back.

I won't do this again.

I'd rather ride my own ride, at my own pace.  


Honda ST1300 Streetfighter

http://thekneeslider.com/honda-st1300-streetfighter/


I love this.

Lock your Motorcycle Helmet | Motorcycle Rider Basics

http://www.motorcycleriderbasics.com/someone-took-my-helmet/


This is a pretty good article on the various options out there, from a generic application.

Helmet Lock - Motorcycle Helmet Dual Lock

http://www.ascycles.com/detail.aspx?ID=1621


I'm in the market for a helmet lock for my ST1300. This might work, I'll have to study the positioning of the plate to see.

I've seen her naked! Working on a fully faired motorcycle.

I changed the oil today. 

The blog serves as a maintenance log for my bike, which is another plus.

It may not be the best use of a blog, but it works for me. And, I usually pontificate on something when I record the maintenance ... so that counts as a blog entry.

I really didn't do a good job of recording the last time I changed the oil.  I mean, I know the date, but can't place the mileage.


Like this time, I probably snapped a photo of the odometer at the time I did the change.

Unlike this time, I didn't follow through and actually blog it.

  About the work itself ...

The oil was black as pitch, and had little chunks of some sludge which I didn't like the looks of.  I don't know how many miles I've ridden between changes.  But I know I only changed it in October.  Given the late start to the season, I can't have put that many miles on it.  Maybe 1,000.  I mean, I've put only 5,000 on it since I bought it in March of 2011.  (2011 was a horrible year for riding, but that's another tale for another day.)

Regarding the maintenance work itself, I'm getting better at it.  I don't know if I'll ever really enjoy working on a fully faired bike or not.  But I do think working on ones own bike is essentially to really developing a rapport with the machine.  Without it, you feel like a guest or an acquaintance.  Once you've worked on the bike, you're a bit more intimate.  After all, I've seen her naked!

 Only, in this case, it's not quite true.  I haven't had cause to strip her down and remove the shroud.

I've only peeked around the bits.

The day that I do strip the bike naked to work on it -- and I don't know what would require that at this point -- that'll be the day I truly know the bike.